標籤雲

Android (59) ActionScript (52) PHP (14) JavaScript (11) 設計模式 (10) CSS與Html (8) Flex (7) Material Design (6) frameworks (5) 工具 (5) 串流影音 (4) 通用 (4) DB (3) FlashRemoting (3) Java (3) SQL (3) Mac 操作 (2) OpenGL ES (2) PureMVC (2) React Native (2) jQuery (2) AOSP (1) Gradle (1) XML (1) 軟體設定 (1)

搜尋此網誌

顯示具有 Material Design 標籤的文章。 顯示所有文章

2015/10/12

Material Design - Animations

Material theme 本身就有對於按鈕或 Activity 切換提供預設的動畫
而 Android 5.0 (API level 21) 之後則可以對於以下動畫進行客製化:

Touch feedback

Button 的預設 Touch feedback 是使用 RippleDrawable
若想套用這個動畫效果可以把 xml 裡的 background 屬性設為
?android:attr/selectableItemBackground (View 本身範圍內的波紋)
或 API level 21 的新屬性 ?android:attr/selectableItemBackgroundBorderless (View 本身上面, parent 範圍內的波紋)
或是用 xml 以 ripple 標籤定義 RippleDrawable

ripple 的顏色可以用 android:colorControlHighlight 設定

Circular Reveal

Reveal 動畫可以在顯示或隱藏一組 UI 時為使用者提供視覺延續性
ViewAnimationUtils 只有一個 Public Methods
ViewAnimationUtils.createCircularReveal(View view, int centerX, int centerY, float startRadius, float endRadius)
它可以回傳一個圓形裁剪動畫的 Animator

來看一下範例
//  invisible 的 view
View myView = findViewById(R.id.my_view);

// 取得 view 的中心位置做為 clipping circle 的圓心
int cx = myView.getWidth() / 2;
int cy = myView.getHeight() / 2;

// 取 view 的長邊尺寸做為 clipping circle 的最終半徑大小
int finalRadius = Math.max(myView.getWidth(), myView.getHeight());

// 呼叫 createCircularReveal (startRadius 是 0)
Animator anim =
    ViewAnimationUtils.createCircularReveal(myView, cx, cy, 0, finalRadius);

// 將設為 visible 然後進行動畫
myView.setVisibility(View.VISIBLE);
anim.start();

如果是隱藏的話就要改成這樣
Animator anim =
    ViewAnimationUtils.createCircularReveal(myView, cx, cy, initialRadius, 0);

// 在 onAnimationEnd 時把 view 設為 invisible
anim.addListener(new AnimatorListenerAdapter() {
    @Override
    public void onAnimationEnd(Animator animation) {
        super.onAnimationEnd(animation);
        myView.setVisibility(View.INVISIBLE);
    }
});

anim.start();


Activity transitions
Activity 間的轉換
可以自訂 enter 跟 exit 以及 shared elements 的 transitions

Android 5.0 (API level 21) 支援的 enter 跟 exit transitions 有:
explode (中心放大/縮小)
slide (滑入/滑出)
fade (淡入/淡出)

只要是繼承自 Visibility 的 Transition 類別都可以做為 enter 跟 exit 的動畫

支援 shared elements 的 transitions 有:
changeBounds (邊界)
changeClipBounds (邊界裁剪)
changeTransform (scale 跟 rotation)
changeImageTransform (圖像的 size 跟 scale)

<style name="BaseAppTheme" parent="android:Theme.Material">
  <!-- enable window content transitions -->
  <item name="android:windowContentTransitions">true</item>

  <!-- specify enter and exit transitions -->
  <item name="android:windowEnterTransition">@transition/slide</item>
  <item name="android:windowExitTransition">@transition/slide</item>

  <!-- specify shared element transitions -->
  <item name="android:windowSharedElementEnterTransition">
    @transition/shared_element_transition</item>
  <item name="android:windowSharedElementExitTransition">
    @transition/shared_element_transition</item>
</style>

transition 的 xml 範例如下
shared_element_transition.xml
<transitionSet xmlns:android="http://schemas.android.com/apk/res/android"
    android:transitionOrdering="together">
    <changeBounds />
    <changeTransform />
    <changeImageTransform />
</transitionSet>

transition 如果不用 theme 指定的話
也可以用 code 來設定
但要記得 requestFeature
// inside your activity (if you did not enable transitions in your theme)
getWindow().requestFeature(Window.FEATURE_CONTENT_TRANSITIONS);

getWindow().setEnterTransition(new Explode());
Window.setSharedElementEnterTransition();

Window.setSharedElementExitTransition();
getWindow().setExitTransition(new Explode());

另外 Window.setAllowEnterTransitionOverlap(true) 可以讓 enter transition 盡快進行

Activity 切換的範例 code 如下:
getWindow().setExitTransition(new Explode());
Intent intent = new Intent(this, MyOtherActivity.class);
startActivity(intent,
    ActivityOptions.makeSceneTransitionAnimation(this).toBundle());

有 sharedElement 的話請參考這裡:
ActivityOptions options = ActivityOptions.makeSceneTransitionAnimation(this,
        Pair.create(view1, "agreedName1"),
        Pair.create(view2, "agreedName2"));
// start the new activity
startActivity(intent, options.toBundle());

Curved motion
Android 5.0 (API level 21) 之後可自訂動畫的時間曲線及補間曲線
新的 PathInterpolator 類別是基於貝茲區線 (Bézier curve) 的 interpolator 或 Path 物件
曲線定義在 1x1 範圍的座標(0, 0)到(1, 1)

自訂 pathInterpolator 的 xml 範例如下:
<pathInterpolator xmlns:android="http://schemas.android.com/apk/res/android"
    android:controlX1="0.4"
    android:controlY1="0"
    android:controlX2="1"
    android:controlY2="1"/>
</style>

material design specification 中
系統提供了三種基本曲線的 XML resources:

@interpolator/fast_out_linear_in.xml
@interpolator/fast_out_slow_in.xml
@interpolator/linear_out_slow_in.xml

設定 interpolator 的方法是將 PathInterpolator 物件傳入 Animator.setInterpolator 中
Animator.setInterpolator (TimeInterpolator value)

ObjectAnimator 也提供了一些新的 constructor 讓我們傳入 Path 物件, 例如:
ObjectAnimator mAnimator;
mAnimator = ObjectAnimator.ofFloat(view, View.X, View.Y, path);
...
mAnimator.start();

View state changes

StateListAnimator 讓我們可以在 view 的 state change 間進行動畫

<!-- animate the translationZ property of a view when pressed -->
<selector xmlns:android="http://schemas.android.com/apk/res/android">
  <item android:state_pressed="true">
    <set>
      <objectAnimator android:propertyName="translationZ"
        android:duration="@android:integer/config_shortAnimTime"
        android:valueTo="2dp"
        android:valueType="floatType"/>
        <!-- you could have other objectAnimator elements
             here for "x" and "y", or other properties -->
    </set>
  </item>
  <item android:state_enabled="true"
    android:state_pressed="false"
    android:state_focused="true">
    <set>
      <objectAnimator android:propertyName="translationZ"
        android:duration="100"
        android:valueTo="0"
        android:valueType="floatType"/>
    </set>
  </item>
</selector>
用法為將這樣的 xml 透過 android:stateListAnimator 屬性指給 view
在 code 裡則是透過 AnimationInflater.loadStateListAnimator (Context context, int id) 將 xml 的 StateListAnimator 載入進來
再用 View.setStateListAnimator(StateListAnimator stateListAnimator) 設定

由於 material theme 的 button 都有 Z 屬性
android:stateListAnimator 如果傳入 @null 則 Z 屬性不會有效

AnimatedStateListDrawable 類別則是 state 間的 drawable 動畫
有些 Android 5.0 的 widget 也是利用這樣的動畫方式
範例如下:
<!-- res/drawable/myanimstatedrawable.xml -->
<animated-selector
    xmlns:android="http://schemas.android.com/apk/res/android">

    <!-- provide a different drawable for each state-->
    <item android:id="@+id/pressed" android:drawable="@drawable/drawableP"
        android:state_pressed="true"/>
    <item android:id="@+id/focused" android:drawable="@drawable/drawableF"
        android:state_focused="true"/>
    <item android:id="@id/default"
        android:drawable="@drawable/drawableD"/>

    <!-- specify a transition -->
    <transition android:fromId="@+id/default" android:toId="@+id/pressed">
        <animation-list>
            <item android:duration="15" android:drawable="@drawable/dt1"/>
            <item android:duration="15" android:drawable="@drawable/dt2"/>
            ...
        </animation-list>
    </transition>
    ...
</animated-selector>

這篇好長阿~~~
最後來看一下 AnimatedVectorDrawable

在 xml 檔案中定義 animated vector 有三個要素

1. res/drawable/ 中以 vector 標籤為 root 的 xml 檔
注意它是由裡面的 group 跟 path 標籤組成
而 group 跟 path 標籤都要指定 android:name 屬性才可以
<!-- res/drawable/vectordrawable.xml -->
<vector xmlns:android="http://schemas.android.com/apk/res/android"
    android:height="64dp"
    android:width="64dp"
    android:viewportHeight="600"
    android:viewportWidth="600">
    <group
        android:name="rotationGroup"
        android:pivotX="300.0"
        android:pivotY="300.0"
        android:rotation="45.0" >
        <path
            android:name="v"
            android:fillColor="#000000"
            android:pathData="M300,70 l 0,-70 70,70 0,0 -70,70z" />
    </group>
</vector>

2. res/drawable/ 中以 animated-vector 標籤為 root 的 xml 檔
把 vector 的 xml 檔設定在 android:drawable 屬性
動畫則由 android:animation 屬性來設定
<!-- res/drawable/animvectordrawable.xml -->
<animated-vector xmlns:android="http://schemas.android.com/apk/res/android"
  android:drawable="@drawable/vectordrawable" >
    <target
        android:name="rotationGroup"
        android:animation="@anim/rotation" />
    <target
        android:name="v"
        android:animation="@anim/path_morph" />
</animated-vector>

3. res/anim/ 中有一個或數個 objectAnimator 標籤的 xml 檔
用來定義動畫
<!-- res/anim/path_morph.xml -->
<set xmlns:android="http://schemas.android.com/apk/res/android">
    <objectAnimator
        android:duration="3000"
        android:propertyName="pathData"
        android:valueFrom="M300,70 l 0,-70 70,70 0,0   -70,70z"
        android:valueTo="M300,70 l 0,-70 70,0  0,140 -70,0 z"
        android:valueType="pathType" />
</set>

相關資料:
Defining Custom Animations

Material Design - 關於 Drawable 的新功能

Material Design 關於 Drawable 的部分有三個改進的地方
以下一一描述:

色彩遮罩(Tint)

Material Design 讓我們在 Android 5.0 (API level 21-) 之後可以對 bitmaps 跟 9-patches 使用色彩遮罩
適用的類別有 BitmapDrawable, NinePatchDrawable, VectorDrawable
對以上實體呼叫 setTint (int tintColor)
layout xml 屬性為 android:tint
(如果要清除 tint, 呼叫 setTintList(ColorStateList) 並傳入 null)

要使用的話最好也順便看一下
setTintMode(PorterDuff.Mode tintMode)
android:tintMode
的部分 (setTintMode 預設的 PorterDuff.Mode 是 SRC_IN)

從 Bitmap 中提取突出色 (prominent colors)

新增的 Palette 類別可以在 background thread 讀取 Bitmap 時透過 Palette.generate(Bitmap bitmap) 或 Palette.generate(Bitmap bitmap, int numColors) 在 Bitmap 中提取顏色
若不是在 background thread 可以用 Palette.generateAsync(Bitmap bitmap, Palette.PaletteAsyncListener listener)
及 Palette.generateAsync(Bitmap bitmap, int numColors, Palette.PaletteAsyncListener listener)
傳入 Palette.PaletteAsyncListener 來監聽

可以取得的顏色有以下幾種:
Vibrant, Vibrant dark, Vibrant light,
Muted, Muted dark, Muted light

不管是 Palette.generate 直接回傳的 Palette
還是 PaletteAsyncListener.onGenerated(Palette palette)傳回的
都可以透過如 Palette.getVibrantColor() 這樣的 method 取得 RGB 的 int 值了

記得要幫專案的 dependencies 設定加入 Palette 的 support lib
dependencies {
    compile 'com.android.support:palette-v7:21.0.0'
}

VectorDrawable
Android 5.0 (API level 21-) 之後可以透過 標籤的 XML 定義向量的 Drawable
稱之為 VectorDrawable

官方給了一個愛心形狀的範例如下:
<!-- res/drawable/heart.xml -->
<vector xmlns:android="http://schemas.android.com/apk/res/android"
    <!-- intrinsic size of the drawable -->
    android:height="256dp"
    android:width="256dp"
    <!-- size of the virtual canvas -->
    android:viewportWidth="32"
    android:viewportHeight="32">

  <!-- draw a path -->
  <path android:fillColor="#8fff"
      android:pathData="M20.5,9.5
                        c-1.955,0,-3.83,1.268,-4.5,3
                        c-0.67,-1.732,-2.547,-3,-4.5,-3
                        C8.957,9.5,7,11.432,7,14
                        c0,3.53,3.793,6.257,9,11.5
                        c5.207,-5.242,9,-7.97,9,-11.5
                        C25,11.432,23.043,9.5,20.5,9.5z" />
</vector>

至於 VectorDrawable 的動畫部分也一併在 Material Design 的動畫中說明吧

相關資料:
Working with Drawables
Drawable.setTint(int)
enum PorterDuff.Mode

VectorDrawable

W3C SVG PathData

2015/10/11

Material Design - 陰影與 View 的修剪

Material design 引入了 elevation 來表示 Z 軸高度
elevation 值越大則陰影越廣越柔和
而陰影是由該 view 的 parent draw 出來

一個 view 的 Z 軸高度是由 elevation 值與動畫時的 translationZ 相加而來
Z = elevation + translationZ
Z 的值是以 dp 為單位

Elevation 高度表
Elevation (dp)Component
24Dialog
Picker
16Nav drawer
Right drawer
Modal bottom Sheet
12Floating action button (FAB - pressed)
9Sub menu (+1dp for each sub menu)
8Menu
Card (picked up state)
Raised button (pressed state)
6Floating action button (FAB - resting elevation)
Snackbar
4App Bar
3Refresh indicator
Quick entry / Search bar (scrolled state)
2Card (resting elevation)
Raised button (resting elevation)
Quick entry / Search bar (resting elevation)
1Switch

而動畫相關的屬性是 ViewPropertyAnimator.z() 跟 ViewPropertyAnimator.translationZ()
還可以用 StateListAnimator 針對 View 不同 state 的切換製作動畫

至於陰影是由 background 的 drawable 決定其形狀
但陰影形狀也可以 custom
做法是繼承 ViewOutlineProvider 類別並 Override getOutline() 這個 method
透過 Outline 這個類別可以畫出圓形、矩形、圓角矩形作為陰影形狀
然後呼叫 View.setOutlineProvider(ViewOutlineProvider)
(若傳入 null 則 View 不會有陰影)

最後介紹一下跟 Outline 這個類別有關的 View 物件的修剪( Clipping )
如果我們有設定 setOutlineProvider(ViewOutlineProvider)
而且 ViewOutlineProvider.canClip () 必須要是 true
那我們就可以讓 View 照著 ViewOutlineProvider.getOutline() 回傳的圓形、矩形或圓角矩形形狀被裁切
對應的方法是 View.setClipToOutline(boolean clipToOutline)
layout xml 中的屬性則為 android:clipToOutline

View.setClipToOutline(boolean clipToOutline) 需要注意的規則如下:
只有無圓角的矩形可以被任意套用在 View 上
circular reveal animation 優先於 Outline clipping, 而 child 的 Outline clipping 優先於 parent

另外官方文章特別提到
由於透過這個方法修剪 View 是很耗效能的動作
所以請不要對套用到 View 上的裁剪形狀做動畫
如果要做出相似效果應該要考慮使用 Reveal Effect (這個之後在 Material Design 的自訂動畫部分再介紹)

相關資料:
Defining Shadows and Clipping Views

What is material? > Elevation and shadows

2015/10/01

Material Design - CardView

CardView 繼承自 FrameLayout
而可以有陰影與圓角

可以設定的屬性有下面這些:
card_view:cardElevation 卡片陰影 (對應 View.setElevation() )
card_view:cardCornerRadius 卡片圓角 (對應 CardView.setRadius() )
card_view:cardBackgroundColor 卡片背景 (對應 setCardBackgroundColor(int) )


由於 RecyclerView 跟 CardView 都是屬於 v7 Support Libraries
android.support.v7.widget.CardView
所以必須在 Gradle dependencies 裡面加入以下設定
dependencies {
    ...
    compile 'com.android.support:cardview-v7:21.0.+'
    compile 'com.android.support:recyclerview-v7:21.0.+'
}

相關資料:
Creating Lists and Cards
Android develop 官方範例 - CardView

Material Design - RecyclerView

根據 Android 官方的說法
RecyclerView 是比較先進而靈活的 ListView

RecyclerView 除了要使用 RecyclerView.Adapter 之外還必須指定一個 RecyclerView.LayoutManager

內建的 LayoutManager 有以下三種:
LinearLayoutManager (垂直或水平捲動的 List)
GridLayoutManager
StaggeredGridLayoutManager (交錯的 Grid)

另外 RecyclerView 對 item 的增加與移除有預設動畫
要自訂動畫的話必須繼承自 RecyclerView.ItemAnimator
再透過 RecyclerView.setItemAnimator() 指定

RecyclerView 在 layout xml 是長這樣


接下來看看 code 要怎麼用
public class MyActivity extends Activity {
    private RecyclerView mRecyclerView;
    private RecyclerView.Adapter mAdapter;
    private RecyclerView.LayoutManager mLayoutManager;

    @Override
    protected void onCreate(Bundle savedInstanceState) {
        super.onCreate(savedInstanceState);
        setContentView(R.layout.my_activity);
        mRecyclerView = (RecyclerView) findViewById(R.id.my_recycler_view);

        //如果內容的改變不會改變 RecyclerView 的 layout size, 這可以增進效能
        mRecyclerView.setHasFixedSize(true);

        mLayoutManager = new LinearLayoutManager(this);
        mRecyclerView.setLayoutManager(mLayoutManager);

        // specify an adapter (see also next example)
        mAdapter = new MyAdapter(myDataset);
        mRecyclerView.setAdapter(mAdapter);
    }
    ...省略
}

繼承 RecyclerView.Adapter 的實作範例
public class MyAdapter extends RecyclerView.Adapter {

    private String[] mDataset;

    // 繼承 RecyclerView.ViewHolder 的 ViewHolder 
    public static class ViewHolder extends RecyclerView.ViewHolder {
        // each data item is just a string in this case
        public TextView mTextView;
        public ViewHolder(TextView v) {
            super(v);
            mTextView = v;
        }
    }

    // 透過 constructor 傳入 dataset
    public MyAdapter(String[] myDataset) {
        mDataset = myDataset;
    }

    // 在 onCreateViewHolder 將 item view 給 inflate
    @Override
    public MyAdapter.ViewHolder onCreateViewHolder(ViewGroup parent, int viewType) {
        View v = LayoutInflater.from(parent.getContext())
                               .inflate(R.layout.my_text_view, parent, false);

        // 調整 view 的 size, margins, paddings 及其他 layout parameters
        ...省略

        ViewHolder vh = new ViewHolder(v);
        return vh;
    }

    // 在 onBindViewHolder 將 item view 的內容(依照 position )做更換
    @Override
    public void onBindViewHolder(ViewHolder holder, int position) {
        holder.mTextView.setText(mDataset[position]);
    }

    @Override
    public int getItemCount() {
        return mDataset.length;
    }
}

相關資料:
Creating Lists and Cards
Android develop 官方範例 - RecyclerView

2015/09/15

Material Design - Meterial Theme

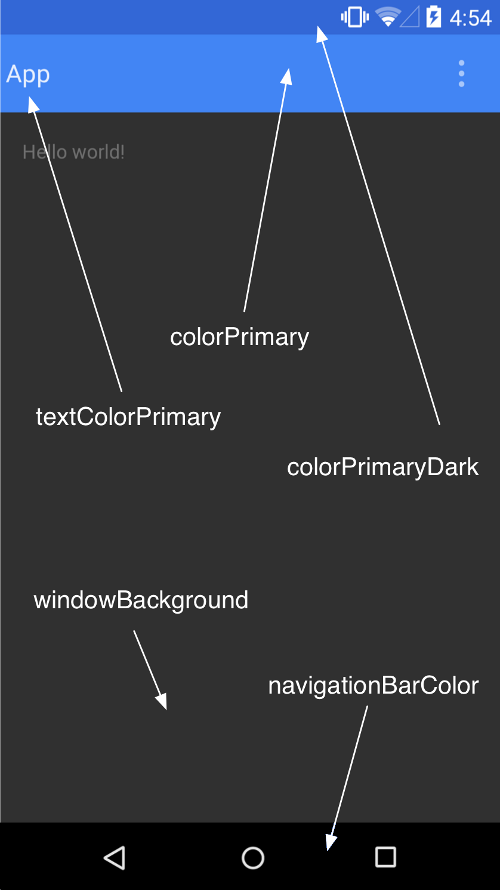
ActionBar 與 Notification Bar 的 style 在 5.0(API 21) Meterial Theme 變得簡單好多
首先了解一下各部分新的設定名稱
借一下官方的圖來用


Material theme 如下:

@android:style/Theme.Material (dark version)
@android:style/Theme.Material.Light
@android:style/Theme.Material.Light.DarkActionBar

<resources>
  <style name="AppTheme" parent="android:Theme.Material">
    <!-- actionbar color -->
    <item name="android:colorPrimary">@color/primary</item>
    <!-- status bar and contextual app bars -->
    <item name="android:colorPrimaryDark">@color/primary_dark</item>
    <!--   theme UI controls like checkboxes and text fields -->
    <item name="android:colorAccent">@color/accent</item>
  </style>
</resources>

要注意的是如果要支持 5.0 前的版本
記得要使用 support library V7 並繼承自 Theme.AppCompat

<!-- Base application theme -->
<style name="AppTheme" parent="Theme.AppCompat.Light.DarkActionBar">
    <item name="android:textViewStyle">@style/DefaultTextViewStyle</item>
    <item name="android:textColorPrimary">@android:color/white</item> <!-- ActionBar 的文字顏色 -->
    <item name="colorPrimary">@color/colorPrimary</item> <!-- ActionBar 底色 -->
    <item name="colorPrimaryDark">@color/colorPrimary</item> <!-- NotificationBar 底色 -->
    <item name="android:windowBackground">@android:color/white</item>
</style>

相關資料:
appcompat v21: material design for pre-Lollipop devices!
Android develop - Using the Material Theme